Campaigns
Table of Contents
- AwareEd Campaigns
- Campaign Details
- Create a Campaign
- Edit a Campaign Draft
- Clone a Campaign
- Start a Campaign
- Stop a Campaign
- Delete a Campaign
- Manage Learners in a Campaign
- Manage Learners Using Dynamic Filters
- Sync Learner Enrollment
AwareEd Campaigns
AwareEd campaigns allow you to deliver security awareness training courses to learners in your organization. AwareEd campaigns can run for a period of time and optionally repeat. When a campaign repeats, each recurrence is called a campaign run. When a new campaign run starts, learners added to the campaign since the start of the previous run will be enrolled in the training course.
The AwareEd campaign page lists all draft, running, and completed campaigns. Click the “three dots” menu on a campaign to see options for starting, stopping, and managing campaigns. You can also add or remove learners in running campaigns and view more campaign details. Use the search to find specific campaigns, and use the arrows along the bottom to navigate through the pages of campaigns.
Campaign Details
The Campaign Details section provides information about a campaign, including for specific campaign runs.
- In the the campaign list click the menu, then select Details.
- Campaign runs will be listed individually showing the status, dates, and other information.
- Click the Graph button to drill into more details about a run.
- After clicking the Graph button, you can view information about learners and their progress in the campaign. Use the search to find a specific learner, and the arrows allow you to navigate through pages. You can also export the information in a .csv file by clicking on the Download button.


Create a Campaign
The campaign builder is divided into sections. Click any section to expand it and change the campaign settings. Click Show Advanced Settings in the upper-right for some additional configuration options.
- Select a campaign template to get started. If you want to build a campaign from scratch, click Custom Campaign.
- Provide a name for your campaign. You can also optionally set the campaign to be a test campaign. Test campaigns will not count towards reporting or learner grades. This is useful for testing new courses or experiencing a campaign as a learner.
- The Content section is where you select your course. Below the course name you can see how many modules are in the course and the approximate time learners will need to complete their training. You can also click the Courses page shortcut to navigate there and manage your AwareEd courses.
- The Learners section is where you select learners to receive training. Enable Select all learners to enroll all learners in the campaign; otherwise you can select any combination of learners and groups to participate. Click the Learners page shortcut to go to learner management.
- The Notifications section is where you configure which notifications learners will receive. You can also define the notification interval for Start and Finish Reminders. For more information on AwareEd notifications click here.
- The Schedule section allows you to the set the duration and configure future runs of a campaign. A campaign can be a single campaign run, or it can repeat daily, weekly, monthly, or quarterly. The repeat value defines the number of additional times a campaign will run. A value of 0 means the campaign will run only once, while a value of 1 will run twice (the intial run, then repeat once).
- The Campaign summary provides an overview of all settings selected above to confirm the campaign configuration.
- Click Save & Schedule Campaign to finalize the campaign, or you can save as a draft if further changes will be needed.


Advanced Settings
Click Show Advanced Settings for additional campaign options.
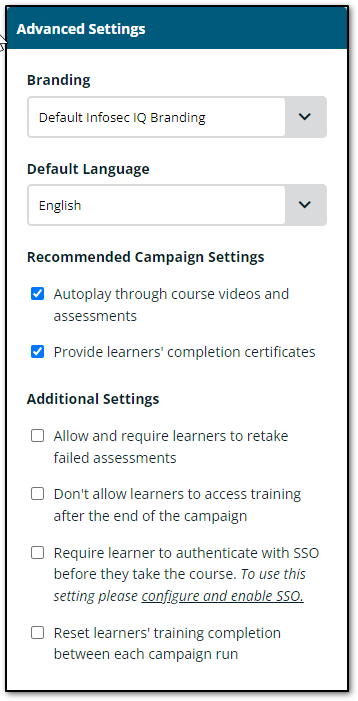
- Branding: The selected brand will appear on the AwareEd course page and in email notifications.
- Default Language: Sets the default language when the language set in the learner’s browser is not supported.
- Autoplay through course videos and assessments: Enabling this will automatically advance a learner to the next module in the course. When this is disabled, the learner will need to navigate back to their course page to start the next module.
- Provide learners’ completion certificates: When this is enabled, the learner will be able to download a completion certificate after finishing the course.
- Allow and require learners to retake failed assessments: Enabling this option will require learners to retake assessments until a passing grade is achieved.
- Don’t allow learners to access training after the end of the campaign: Enabling this option will prevent learners from accessing campaign materials after the current run has completed.
- Require learner to authenticate with SSO before they take the course: Learner Authentication can be enabled when SSO is configured in your IQ account. When this is enabled, learners will be required to login through SSO to access their training. This setting is optional.
- Reset learners’ training completion between each campaign run: When this is enabled, learner progress will be reset in new campaign runs requiring the training to be completed again. This is disabled by default, meaning learners will only be re-enrolled in new campaign runs if training hasn’t been completed.
Edit a Campaign Draft
To edit a draft campaign, click the menu then select click Edit to open the campaign builder. After making changes, either Save & Schedule or Save Campaign As A Draft.
Clone a Campaign
To clone a campaign, click the menu and select Clone. The cloned campaign will appear in the list with a number appended to the name. For instance, if you clone a campaign called Example then the clone will be named Example (1) . The clone campaign will be created as a draft which can be edited before saving.
Start a Campaign
Completed campaigns can be restarted. When restarting a campaign you’ll have an opportunity to select the start date and schedule. Another campaign run is created when a completed campaign is restarted. Any learners who did not previously complete their training will again begin to receive reminders.
- Hover over a completed campaign and click the Start button.
- In the Start Campaign popup window, select Start Date, Length, and schedule for the campaign.
- Click Start to finalize the campaign.

Stop a Campaign
In the the campaign list, click the menu then select Stop. This stops the running campaign run as well as any future runs. Once a campaign has been stopped it cannot be resumed, but it can be restarted.
Return to Table of Contents
Delete a Campaign
In the the campaign list, click the menu then select Delete. Click Yes to confirm deletion.
Note: Campaign deletion cannot be undone. Deleting a campaign will also delete all reporting data for the campaign. If you wish to retain analytics from a campaign, you must run a report and export the information prior to deleting it.
Manage Learners
Follow these steps to add individual learners to a campaign. Note that enrollments can only be updated when a campaign is running.

- In the the campaign list, click the menu then select Add Learners.
- In the popup window, select Add Individual Learners.
- Click on learners in the Available Learners list. Learners will move into the Selected Learners list. You can also click on learners in the Selected Learners list to remove them.
- Search for specific learners using the search box at the bottom of either list.
- Confirm your selection by clicking the Add Learners button.
To remove individual learners from a campaign:
- In the the campaign list, click the menu then select Remove Learners.
- In the popup window, select Remove Individual Learners.
- Click on learners in the Available Learners list. Learners will move into the Selected Learners list. You can also click on learners in the Selected Learners list to remove them.
- You can search for specific learners using the search box at the bottom of either list.
- Confirm your selection by clicking the Remove Learners button.
Manage Learners Using Dynamic Filters
Add learners with dynamic filters

- In the the campaign list, click the menu then select Add Learners.
- In the popup window, select Add Learners via Dynamic Filters.
- Select Filter Relationships. This option controls how multiple filters interact. Selecting “And” means that all conditions must be met, while selecting “Or” means that any condition can be met.
- Add at least one filter by selecting a Field and Operator, and provide a Value. You must click the + button to add the filter.
- Multiple filters can be added, and unwanted filters can be removed by clicking the X button.
- Click Process Learner Preview to preview the list of learners.
- Click Add Learners to add all learners in the preview to the campaign.
Note: Learners will appear in the learner preview if they match the defined filter conditions, even if they are already enrolled in the campaign. Learners cannot have multiple enrollments in the same campaign, so re-adding a learner will not impact training.
Remove learners with dynamic filters

- In the the campaign list, click the menu then select Remove Learners.
- Select Remove Learners via Dynamic Filters.
- Select Filter Relationships. This option controls how multiple filters interact. Selecting “And” means that all conditions must be met, while selecting “Or” means that any condition can be met.
- Add at least one filter by selecting a Field and Operator, and provide a Value. You must click the + button to add the filter.
- Multiple filters can be added, and unwanted filters can be removed by clicking the X button.
- Click Process Learner Preview to preview the list of learners.
- Click Remove Learners to remove all learners in the preview from the campaign.
Note: Learners will appear in the learner preview if they match the defined filter conditions, even if they are not currently enrolled in the campaign.
Sync Learner Enrollment
If a group is enrolled in a campaign, learners in that group will be added to or removed from the campaign at the start of each new run. If you want newly-added group members to be immediately added to the current run of the campaign, click Sync Enrollments from the menu in the campaign list. Any new group members will be added to the campaign immediately, and any learners who have been removed from the group will also be removed from the campaign.
Note that learners added via Sync Enrollment may have less time to complete their training. For example if a campaign ends in five days, a learner added today via Sync Enrollment will only have five days to complete it.
Note: The Sync Enrollment functionality will only affect campaigns where learners were enrolled via group membership.